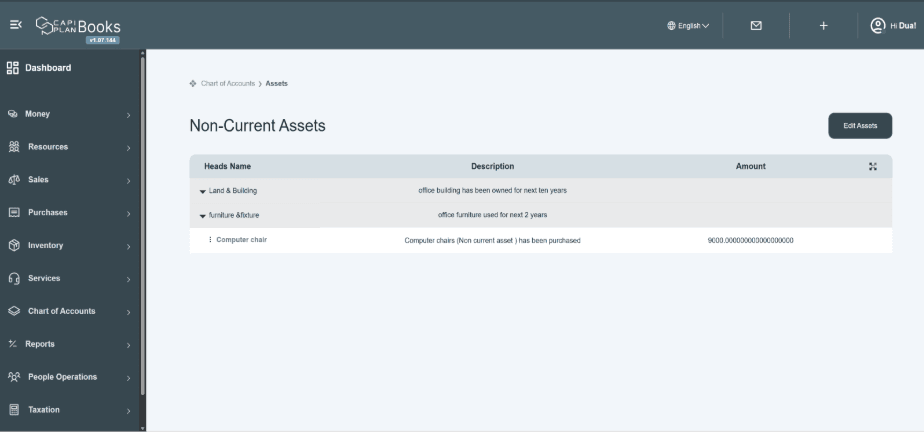
Procedure to Record Non-Current Assets in the CapiPlan Books
To create an asset user, they have to follow the path to register an asset under the non-current asset category in the charts of accounts.
Navigation path: Non-Current Asset → Create Head → Purchase → Bill → Add Bills → Back to Non-Current Asset Head → Create an Asset.
- Create a header under Non-Current Asset Module
Click on the Non-Current Assets head.
When you click on the non-current assets head, it shows you a new page. This page allows you to create new asset accounts.
There is a button given, i.e., “Create Account.” Click on it.

Click On “Create Account” Button
When the user clicks on non-current assets, a new pop-up window will appear in front of the user.
That allows you to create a new asset head in it. There is a table given to enter the asset’s title, name, and information in it.
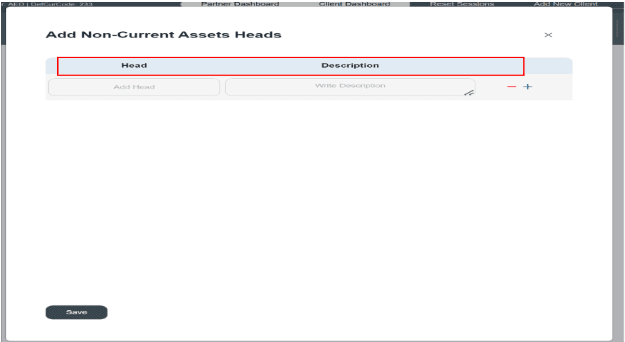
There are two columns given in a row, i.e., head name and description.
Users can add a new head title name in the first block. E.g., land and buildings, furniture & fixtures, and intangible assets.
In the second block, write a description related to its head title or category. E.g., office building space has been owned for the next ten years, or office furniture has a useful life of 10 years. (This description box is optional).
There are add-in (+) and remove (-) options available to remove or add new rows below to add more assets heads name.

Now click on the save button; new information will be saved in the system.
Users can see the new asset head name will be created and displayed on the front page of non-current assets having expandable sections, located in the table. Each head can be expanded to view the asset types inside it.
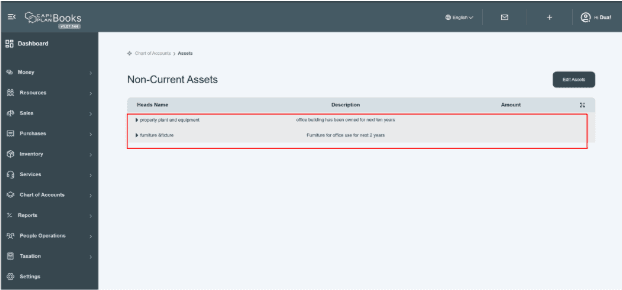
- This table shows you summarized information about every head. It consists of columns of head name, description, and amount.
- Amount column displays the monetary value of each asset.
There is an Edit button located on the top right side of the page to update the information.
Click on Edit button.

- When you click on the edit button, it opens the same previous pop-up window.
- It will allow the user to update or edit new information or make required changes as per your need.
- You can also remove (-) or add in (+) a new head in a row.
For example, let’s say we add property, plant, and equipment head in the non-current assets list.
- Then click on the save button; new information would be displayed on the front page of non-current assets.
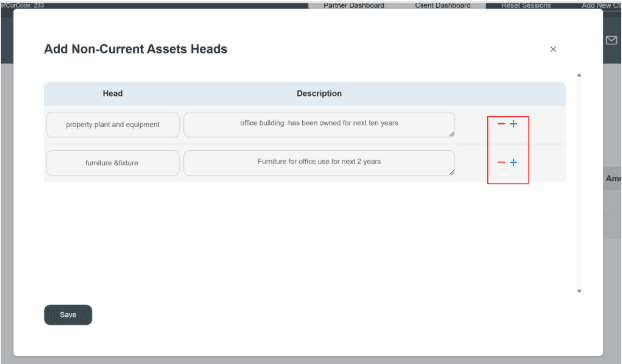
After clicking on the save button, new changes will be made and shown on the front table of the non-current asset page.
- Book a Bill Against the Asset
After creating the non-current asset head, record a bill against the asset. This will enable you to create a new asset under its respective category. This requirement is necessary to record a bill against a specific asset. When a company purchases an asset, it is treated as a purchase or expense. Therefore, it is essential to record the corresponding bill in the system to properly account for the transaction.
Please Remember: To book the bill to create an asset, select “others” in the item field, and only then will it allow you to select the account category in the “account” field, which shows you the non-current asset category in the drop-down menu. Select that asset category. Once you select and fill in all the information, it will allow you to create an asset under its required head.
For this purpose, it is required to create a supplier in the Resources section from whom you are purchasing the asset.
Process to Add Bills
First go to the “purchase” module located in the side panel. When you click on the navigation bar, there is a submodule given, i.e., “bill.” Click on it and it shows you this window.
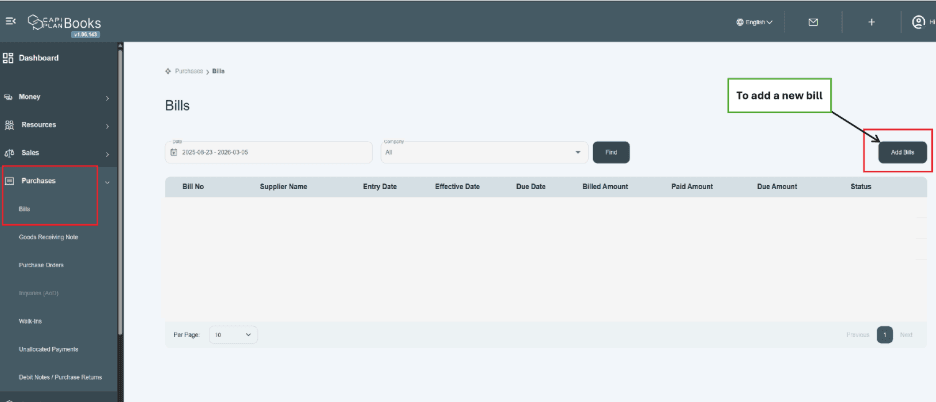
Click on the add bill button located on the top right side of the page; it will show you a new window as shown below.
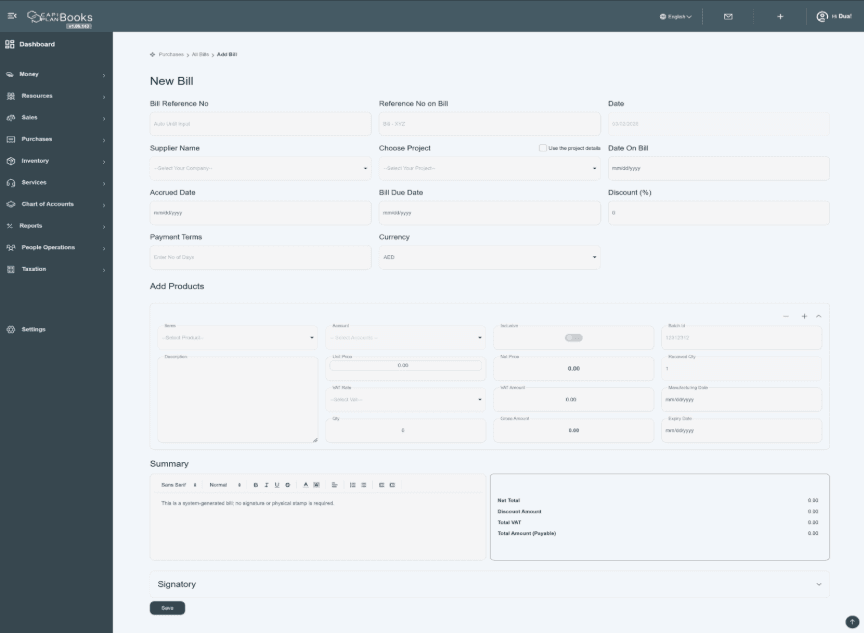
Fill the following information like this:
- The bill reference number is basically that number through which the user can track or identify the bill in the future; otherwise, the system will generate it automatically as per the default setting.
- Enter the reference number given on the bill, or this number could also be generated by the system, e.g., Bill-ADC.
- This date is basically the posting date, which will already be set as per the default setting.
- Enter the supplier’s company name. e.g., ABC Tower LLC.
Note: To book the bill, the user first creates the supplier in the Resources section. If the supplier has not already been created, you can directly access the option by typing the supplier’s name in the Company field dropdown. The system will display an ‘Add New’ option. Click on it to create a new supplier company name or go to the section “How to add Supplier’s Company Name While Creating Bill.”
- Click on “project” if you want to link any specific bill to a specific project; then choose that project from the existing category given in the drop-down menu, and if you want to add a new project, then go to the section “How to Add New Project Name” while creating the bill and follow the instructions.
- Use Project Details – Check this box to auto-fill details from the selected project.
- Enter the date on the bill on which the order is placed. 11/01/2025.
- Enter the accrued date, meaning on which date the user received the bill. E.g., 11/10/2025.
- Enter the Bill Due Date, which is the deadline to pay the supplier bill before or on 11/20/2025. After that due date, it becomes overdue.
- Enter the discount rate if you received any discount on the bill. E.g., the discount rate is 10%. But if you didn’t receive any discount from the supplier, then
- Enter the payment terms, meaning the number of days the bill remains valid. E.g., 19 days.
- Enter and select the currency for the quotation (e.g., AED).

How to Add Product in Bill
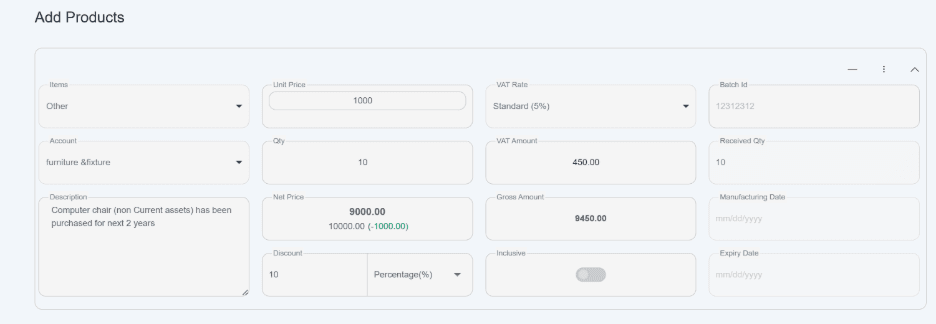
- Click and select the items from the dropdown list. Here you have to select the “other option”. Because when you select other option in item, it will give you access to assigned the required non-current assets category to its respectable account head.

- Enter Account name. Select “others” in item section which will allow you to select the account code in respective category, as per your requirement.
- If you don’t find your account code in drop down list then go to “charts of accounts” Profit and loss sub head, A new page will open which will allow user to create a new account head or add new account head under default categories.
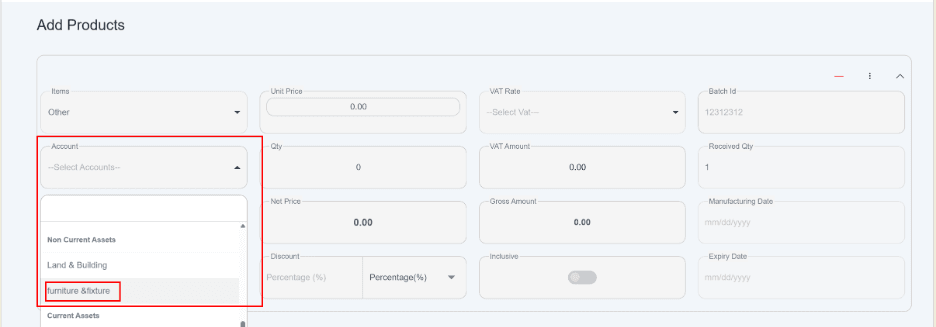
 Enter description like brief detail of product/service. E.g. Computer chair has been purchased for next 2 years.
[Text Wrapping Break]
- Mention the unit price, the price of one unit. If your item is related to service then stay empty this block. E.g. AED 1000.
- Enter Quantity, quantity of products. (We enter quantity only for products not for service). E.g. quantity of chairs is 10.
- Net price would be automatically calculated. E.g. If the unit price is AED 1000, then the cost for 1 piece, would be AED 10,000.

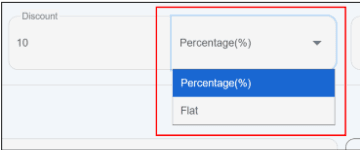
- Discount- this is basically inclined discount, apply discounts directly within items for your invoices and bills. if you received any discount on bill user can enter that information like
Use Percentage → when giving standard discounts (like 5%, 10%)
Use Flat → when giving exact amount off (like 500 rupees discount).
- Click and select applicable VAT rate. e.g. 5% standard. This determines how much VAT is applied.
- Automatically system will calculate Vat amount. e.g. would be AED 450.00. this price is based on unit price, quantity and vat rate.
- Gross amount will automatically calculate and shows you total final amount including vat. e.g. AED 9450.00 as given in example.
- inclusive checkbox, here it works like – in unit price VAT amount is already added. Here system only deduct and calculate the original price of product and calculated VAT amount from the unit price.

- when you click on, the inclusive button, it means Vat amount is deducted from total amount. And when you click Off, the butt it means Vat amount is Included.
| Option | Meaning |
| ON (Red) | VAT is excluded from unit price |
| OFF | VAT is included in unit price |
- Batch id, manufacturing date, received quantity and expiring date these options will disable when you select “other” in “item” field. But remember this will happened only when you want to book the bill against charts of accounts.
- There is a swipe up feature is given on the left side of the row. This option is given for user convince to arrange the sequence of the items as per their preference.
- Now this all for the information to add product row.
- This is the method to enter information in the “Add Product” block up to this point.
If you want to add multiple “Rows or header” on the top
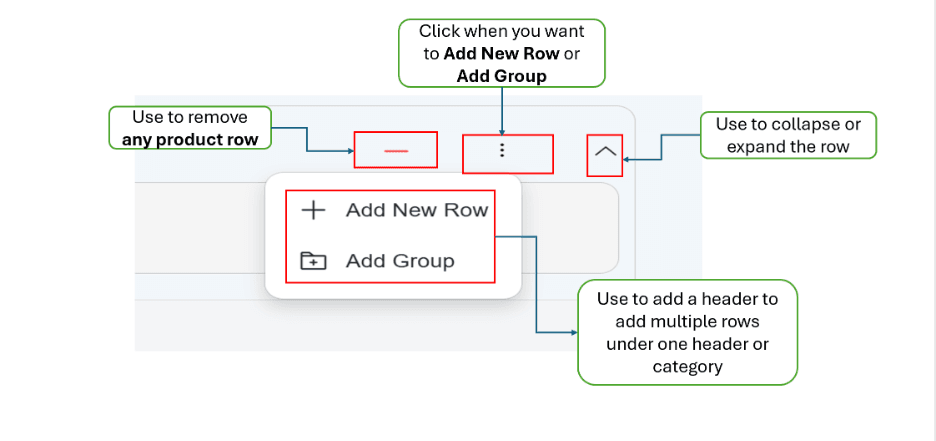
Now on the right side of the row, there are options available through which user can add common header, remove or add new rows, collapse icon and more three dots menu button  are given to add multiple rows or categorized information in bills.
- Remove (-) button– given to remove the rows.
- Collapse button– given to minimize the product section.
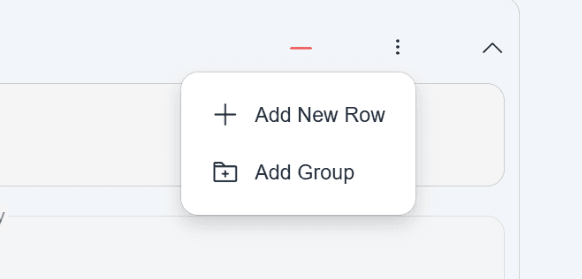
- Click on “three dot Menu” button
Click on it, shows you drop down options which are explained below.
Add New Row
- Purpose: To insert a single new row in the table or list.
- Use Case: When you want to add a new individual item, record, or entry.
- Example: Adding a new product, a new transaction, or a new line item in an invoice.
Add Group
- Purpose: To create a group or category within the table.
- Use Case: When you want to organize multiple rows under a common heading or category.
- Example: Grouping products by type, grouping tasks by project, or grouping inventory items by location.
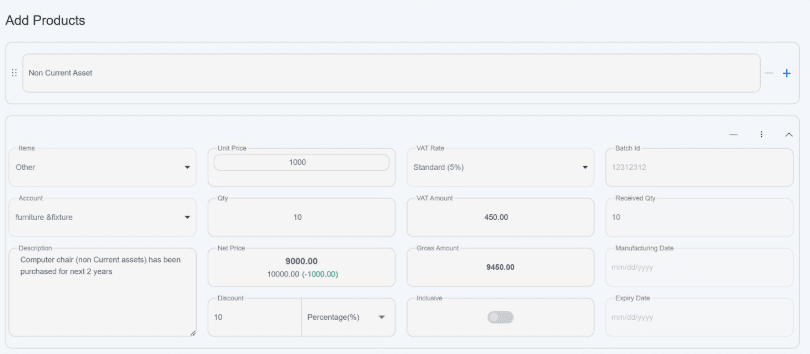
Once you added any row or header it will look like this,
Summary
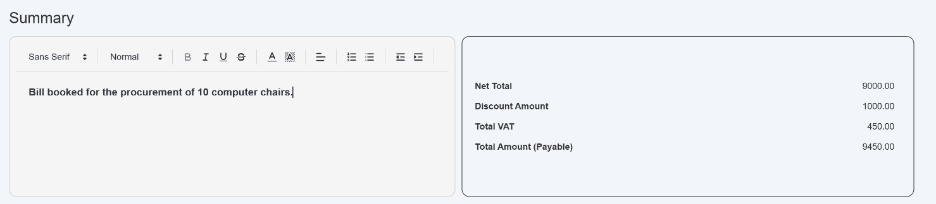
- Enter a Brief Summary in the designated text area to include comments, special instructions, or specific terms and conditions related to the bill. This section allows you to clearly communicate any additional details to the customer.
Users can also configure default terms and conditions in the system settings. Once set, these terms will automatically appear on every invoice, eliminating the need to enter them manually each time.
- On the right of table financial Summery is given which automatically calculated your net amount, discount apply on overall amount, before or after VAT amount and total payable amount.
Signatory
- There are three options given for the signature for responsible persons. Select the authorized persons or department responsible for approving or signing the proforma invoice.
- After enter all information successfully, click on saves the purchase and adds it to your records.

- After submit the form, all your information will appear on the screen in a summarized form.
- In list of suppliers, you can see all brief information and you can add new bill easily through the front page.
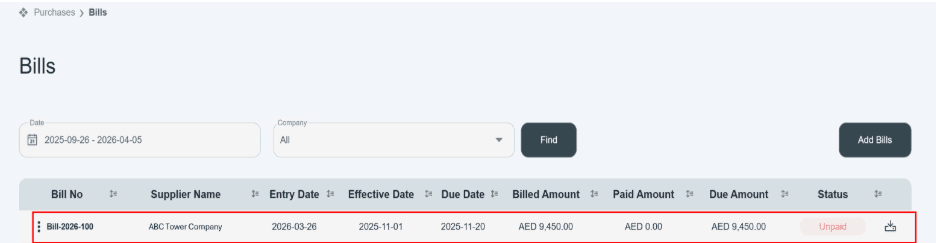
Please note that the bill status does not impact the creation of assets. You only need to record the bill against the relevant product, and then navigate to the Non-Current Asset page to create the asset.
- How To Registered Non-Current Assets Under Required Account
Methods to create an asset
After booking the bill, user can create an asset directly through “Bill or through Non-Current Asset” module.
- Through Bill
- Through Non-Current Asset Module
After booking the bill against the asset, go back to the Non-Current Asset module. Then, click on the account head you selected earlier in the ‘Accounts’ field and click on the expand (dropdown) icon to view the related asset details.
Once you click on expand icon with the account head name, the system will show an entry titled “Not an Asset Yet” corresponding to the item recorded in the bill section.
In short, it serves an indicator that the accounting head is exist but no assets has been added yet. It means you have to click on it and convert the blank head into a detailed asset.
On the right side of row, it shows you actual amount of assets. As example given in image as 9000.
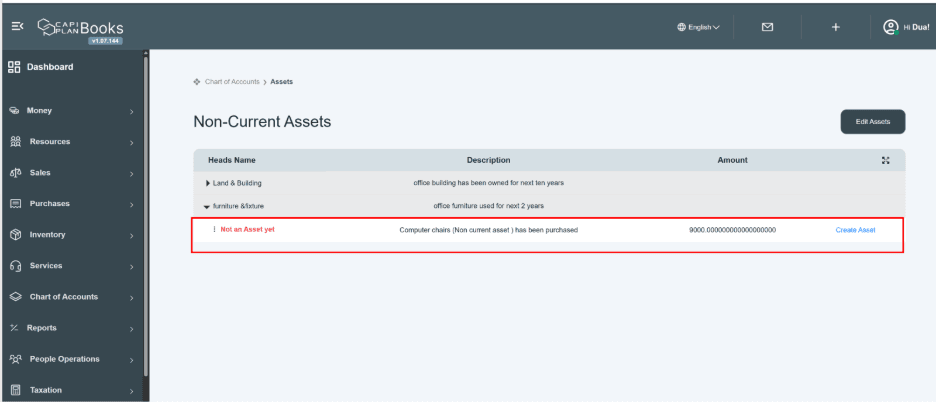
Since you booked the bill, included vat amount (i.e. 9450 as per the example) but while registration of assets, as per the law vat amount will be exclude from the total amount since that amount will be adjustable in quarterly Vat report as per UAE law.
Now click on Create Assets option through this option you can convert your blank head into a detailed assets list.
Click on create assets button
When you click on create assets button. It will open a new window.
This page required the non-assets information like its reference number, asset name, purchase detail, currency, cost of purchase, description and other information related to non-current assets. There is a section given to add depreciation information, charged on overall asset.
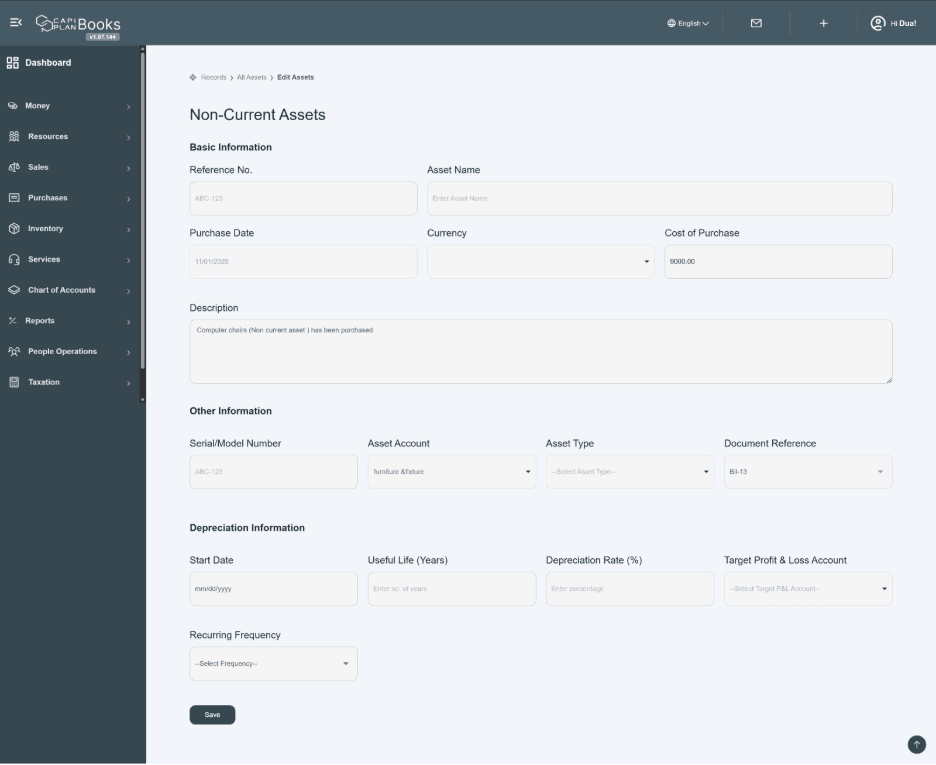
Fill the information like this.
Basic information
- First enter reference number for an identification of an asset to track the record. E.g. ABC-123
- Enter assets name. E.g. Computer chairs
- Enter purchase date on which you buy the assets. E.g. 11/01/2025
- Click and choose the currency in which bill was issued. E.g. AED.
- System already entered the price of product (excluded the Vat amount). E.g. AED 9000.
- Enter any description related to asset.
Other information
- Enter the asset’s serial or model number for identification and tracking.
- Click and select the asset relevant account head name. (E.g. Furniture & fixtures) from the drop down.
- Click and select Asset type. It shows you two options. i.e. Tangible and non-Tangible. Choose any one option;
Select “Tangible” if the asset has a physical form (e.g., furniture, equipment).
Select “Intangible” if the asset does not have a physical form (e.g., software, licenses).
- Document reference number has already added by the system shows you the reference of bill, where you add product and financial detail regarding product.
Depreciation Information
- Enter start date means the day the when asset is installed and ready to use or when its financial life is begun. E.g. we purchase chair on 11/10/2025 and it arrived on 11/20/2025 and you place it at your desk on 11/25/2025. So, we start depreciation of computer chair from 11/25/2025.
Note: because depreciation starts when asset officially begins its useful life or from the day when asset is active to use and stop when its useful life become end.
- Enter its useful life duration. E.g. 5, 10 years etc.
- System automatically calculated depreciation rate (%) on the behalf of its useful life. E.g. 20%.
- Click and select the target profit & loss account head. if you don’t have account head in drop down menu then
Go to Profit and loss sub module.
A new page will open which will allow user to create a new account head or add new account head under default categories by clicking on Add new Head button

For example, this entry is recorded under the depreciation head as an expense. Therefore, a new head titled ‘Depreciation’ should be created.
- Selecting frequency of depreciation-Select how often depreciation should be charged on the asset (monthly or annually). Once the frequency is selected, the system will automatically generate the depreciation schedule based on their start date up to the current month.
- Click on save button to save the required information.

- After enter the information successfully, click on Save Button. your information will be saved in system.
Save & View Asset
- Once the information is saved, the asset details will be displayed in the main table, under its respective category with the summarized description (mentioned in bill) and the actual asset value.
- You can analysis the details by clicking on asset title. (This section is not editable but can be deleted).