
How to Add New Project Name while creating bill
Click on the choose project option.
Click and select the option if the required project is given in the drop-down section.
If your project is not given in the below section, just write your project name in the given space; you can see the “Add New” option is given in the drop-down section, written in blue font.
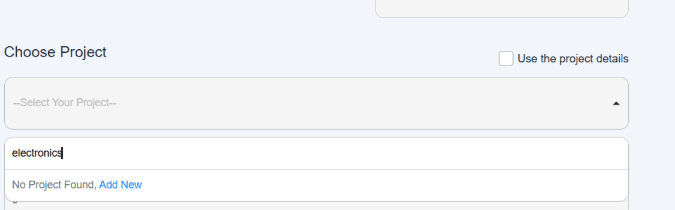
Click on Add New Project.
Once you click on add new project, you can see a new window comes on your screen. Through this page, it allows the user to add a new project into the system by entering important project details.
How to Add a New Project
- Enter project name, e.g., goods import
- Click and select a project status like it is planning, initiated, execution, or completed.
- Select the start date when the project begins, e.g., 11/01/2025.
- Enter expected end date of projected completion, e.g., 12/05/2025.
- Enter the actual end date (if the project is completed). Leave blank if still in progress, e.g., 12/30/2025.
- Click and select currency in which the project financial will be paid, e.g., AED, USD, etc.
- Enter the total expected cost for completing this project, e.g., AED 500000
- Enter VAT of company registration number, e.g., 0100000
- Enter a project brief description of the project. Like its objective, scope, notes, etc.
- Attach the relevant project document—drag and drop the file into the upload box or click “browse file” to select from your device.
Default Address
- Enter Building/House Number or Name, e.g., XYZ Trading, THE METROPOLIS TOWER
- Enter the correct postal/zip code in it, e.g., 122345.
- Enter the Address Line 1 & 2, e.g., add floor name, street name, block, building name area, etc., e.g., floor number 0, XX building, West Dubai
- Enter the city name, e.g., Dubai.
- Select or type the state or province, e.g., Dubai
- Choose the country from the dropdown list, e.g., UAE.
- After completing all required fields, click on the save button located at the bottom to add details of the project to the system.

- Once you save the project details to the system, go back to the previous page and then fill in all the details.
- At this time, the user will see their project in the Add project option. Now add all remaining details in the system and create the form.
