
Procedure To Add Current Liability
- Create a liability head
In order to add a current liability, go to the chart of accounts and click on “current liabilities”; a new page will be opened in front of your screen.
There are two buttons given that are edit liabilities and create account.
Create Account—use the button to create a new account head.
Edit liabilities—use the button to edit the existing account head.
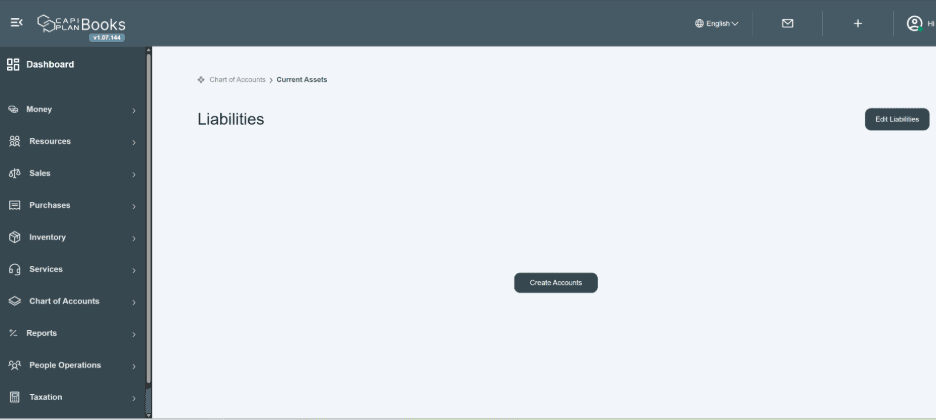
Click on “Create Account” button.
When you click on current liabilities, a new pop-up window will appear.
That allows you to create a new account head and add a description regarding the liability.

- In this pop-up window, there is a table given having columns like head and description.
- Add the title name of the current liability in the Head field. E.g., salary payable, accrued expense, and other current liabilities, etc.
- Add any description related to its head title or category in it as shown in the below image. This description field is optional.
- There are add-in (+) and remove (-) options available. Click on it to remove or add more new rows in order to maintain multiple heads.
Sub Row
- There is a plus icon
 given to add subrows under a common head. (shown in image). E.g., XYZ head.
- After creating all required heads. Click on the Save button, and your new information will be added to the front page of current liability.

Once you click on the Save button, new liability heads will be created as an expendable section and displayed on the front page as shown in the given image.
Click on the expandable icon (▼) next to the main heading to view detailed information.
Once clicked, all the subheadings will be displayed on the screen under the selected category.

This allows you to access and review detailed breakdowns of the selected item.
- If You Want to Edit the Account Head of Current Liability
If you want to edit any head title name, there is an “Edit liabilities” button given on the top right side of the page.
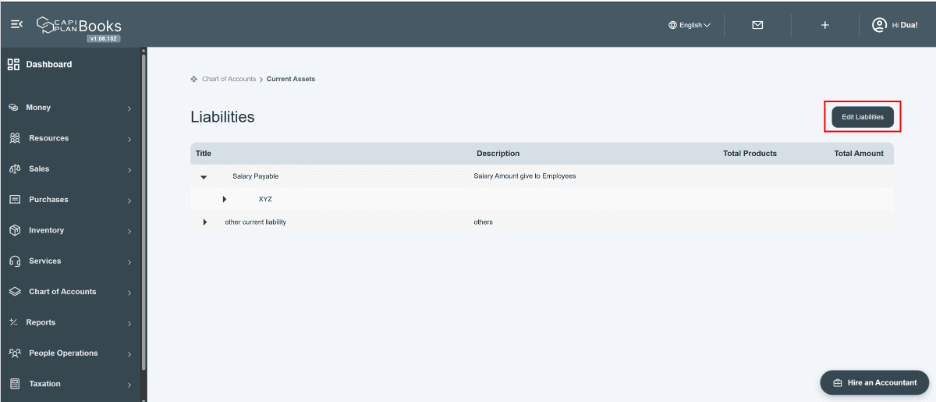
Click on the “Edit Liability” button.
- There is a button located on the right top side of the page. Click on it, and a pop-up window will open. Upon clicking, a pop-up window will open for further action or input.
- A user can edit, add, or remove rows from it. After changes, click on the save button. New information will be added and displayed on the front page of liabilities.
- Create Journal Entry Against the Current Liability
After creating the required account head, the user needs to create a new journal entry to add a liability under its relevant accounting head; go to Journal Entries, located as a subhead of Resources.
How To Create Journal Entry
Open the module; a new window will open showing you a table having multiple columns, which will be going to help you to analyze the information.
There is a button given located on the right side of the window, i.e., Add Journal Entry. Click on the “Add Journal Entry” button (as shown in the image).
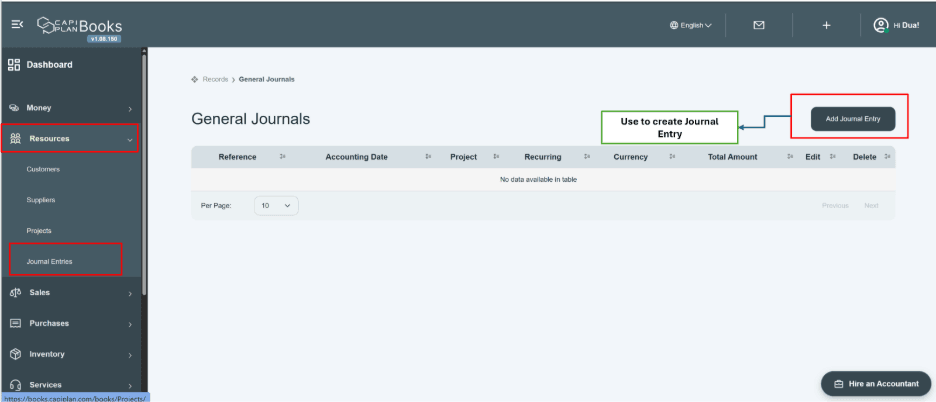
Click on “Add Journal Entry” button.
A new window comes in front of your screen. The following details are required to create a journal entry:
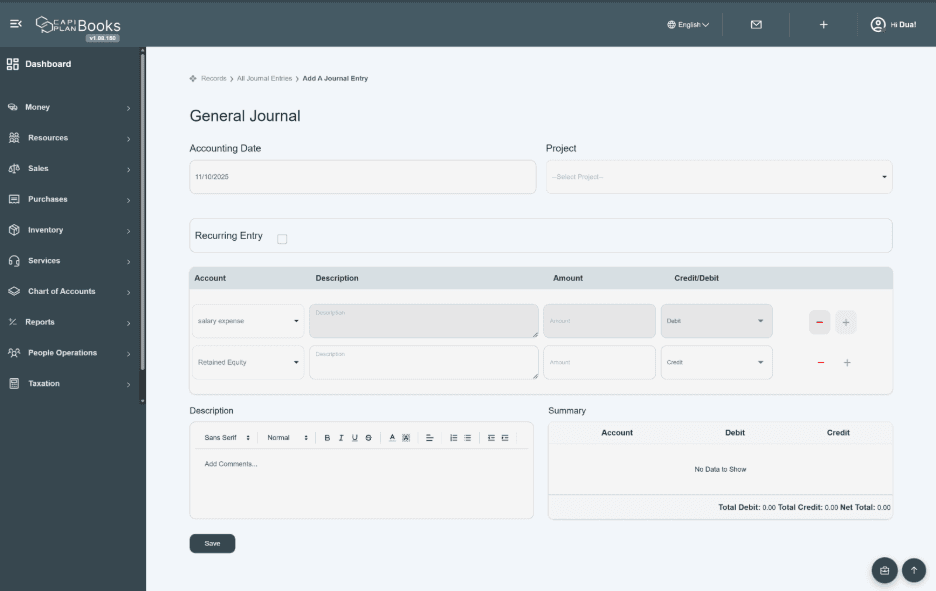
- Click and select the accounting date here, meaning the date on which the journal entry will post. E.g., 11/10/2025.
- Click and enter the project name; this is an optional field, but you can link any project to the journal entry to track the balances. E.g., Project.
- Recurring transaction—This section shows that “Recurring Entry” means the repetition of a transaction. The system automatically added the transaction in calculation until its time period became completed.
- Tick the check box; you will click the checkbox only when you want to create a recurring schedule against the journal entry. After clicking this option, the system will create a schedule. This schedule will run every month on the same date on which the journal entry was originally posted.
- But if it’s not required, then you don’t need to tick the checkbox.
- Click and select recurring frequency, meaning how often the entry should repeat, like daily, weekly, monthly, quarterly, and yearly. E.g., every month.
- Enter total occurrence, meaning how many times the entry should recur. E.g., 12 times.
- Recurring stop date—The system will automatically calculate and show you the recurring stop date, meaning on which date the recurring entry will stop.

Journal Entry table
Basically, this section is used to record financial details here. A debit credit account is involved.
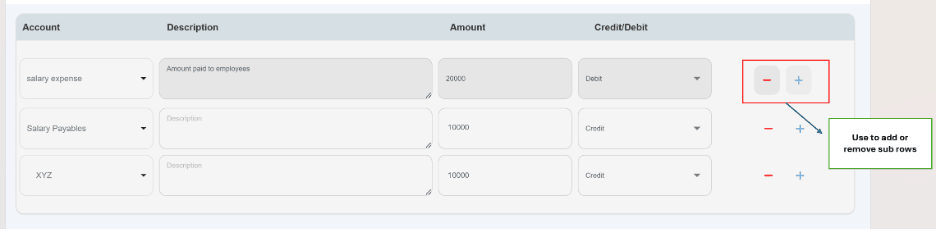
- Click and select the account name as per the accounting category for the debit side. E.g., let’s say salaries expense.
- Click and select the account name as per the accounting category for the credit side. E.g., let’s say salary payable.
- Enter a brief description related to the entry. E.g., salary given to employee.
- Enter the amount and value for the transaction. e.g., AED 20000, etc.
- There are (“–”) or (“+”) options given to add or remove rows. if multiple account rows are required.
- Click on the Save button. A new journal entry will be displayed on the front page of the general journal.
- The system records the first entry on 11/10/2025 and automatically creates the next 12 entries each month.

If the user needs to add more Dr/Cr account rows –
- If the user requires additional rows (e.g., one debit or multiple credit entries), the system provides flexibility.
- Enter the amount as per your account code in one head; in the second, if you want to add more head rows, then distribute the amount as per your need. The system will allow the user to add more sub-rows under the selected head. An image is given for better understanding.
- This helps in detailed allocation and accurate recording of transactions.
Description/summary section –
- After entering information of transaction, the user can add a description below it.
- Enter a short explanation related to the scope of entry.
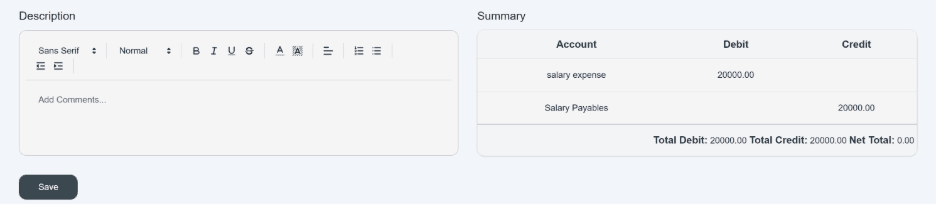
- The summary table displays the live summary of accounts entered above, showing all total debits, credit and net totals.
- Total debit/total credit/net total: automatically calculated total debit and credit must balance (be equal) before saving.
- Click on the save button when all information is successfully entered.
- Once you click on the save button, a new journal entry appears on the front page in the general journal table.
- By clicking on the reference number, you can view the detailed information of the Journal Voucher (JV).

- There is an edit option is given, click on it and you can edit the information. Users can update information and save it again.
- There is a separate table given for the recurring entries. The system records the first entry on 11/10/2025 and automatically creates the next 12 entries of each month on the same date. Displays entries up to the current month.
- Review the Impact on Balance Sheet (Current Liabilities)
After creating the JV against the liability. Since it is a liability, the amount will be reflected on the balance sheet as shown in the figure.
The report shows the balance of these payables at the end of each month. The below screenshot of the Balance Sheet report, the highlighted section refers to the Current Liabilities category, specifically focusing on the head that you created to add liability through journal entry.
Current Liabilities (Category)
Current liabilities represent all the obligations that are due to be paid by the company. It includes several subheads that reflect different dues, such as shown in the below image.
Salary Payable (Head)
To check the impact of the liability amount on the balance sheet, consider the above amount. In November 2025, you recorded 20,000 as a salary payable, indicating that this amount remains a current obligation.
Based on the below screenshot of the Balance Sheet report,
Monthly Breakdown—The table shows month-wise values (Jan–Dec), allowing users to track outstanding salary liabilities over time.
Drill-Down Option—By clicking on the Salary Payables head, users can view detailed transactions (journal vouchers) contributing to the balance.
Impact on Financial Position—This amount is included in Net Current Liabilities, affecting the company’s short-term financial obligations.
The highlighted section refers to the Current Liabilities category, specifically focusing on the Salary Payable head.
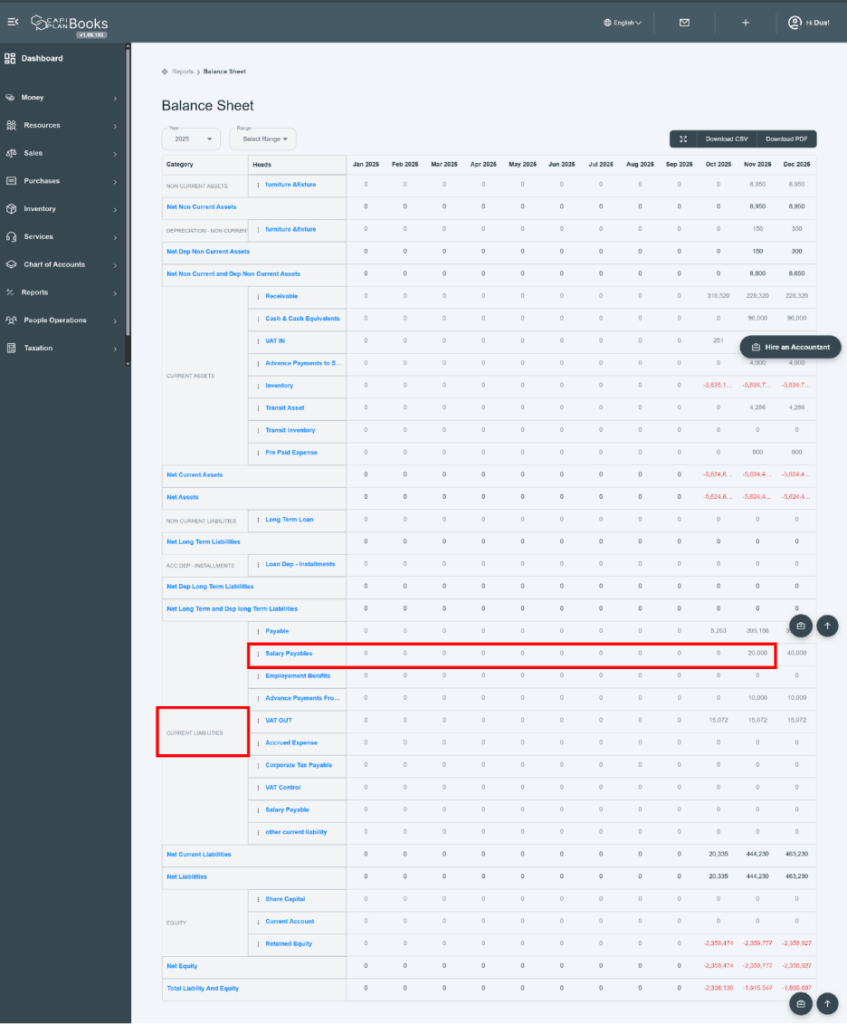
Scroll down to the Current Liability head; Account Payable shows the total financial amount that is still payable by the company.
By clicking the highlighted amount (20,000), the user can view the transaction history and calculation details associated with this account payable.
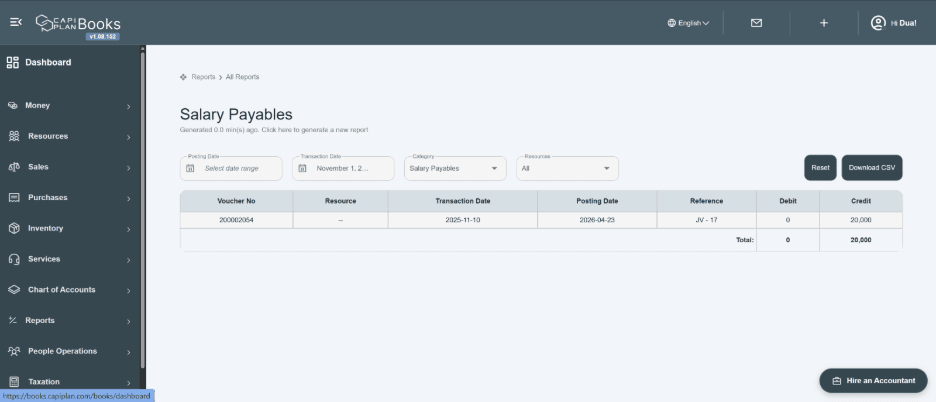
This action redirects you to the Transaction Register, where you can view a detailed breakdown of the specific account code. The summary includes key data points such as the voucher number, resource origin, transaction and posting dates, reference details, and respective debit/credit entries.
In this way, the user can analyze and maintain the current liability record in CapiPlan Books.
