
Walkin Supplier Details
Click on the name of the walking supplier; a new page opens in front of you.
On the top right side of the page, you can see there are two action buttons available, consisting of two options, i.e., “status” and “Add PO.” Users can update the PO status as per the need and directly place a purchase order against the GRN.
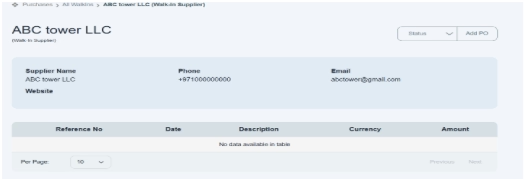
Status – Suspended/Delete
Go to the status button and click on the drop-down button; it shows you two more options, i.e., “suspended” or “delete.”
- Suspend—Suspending a walk-in supplier account means they cannot place orders for now, but their data is still saved.
- Delete button—Permanently removes an account, record, or item from the system. E.g., permanently removes a supplier account, record, or item from the system. By clicking on any option, supplier information would be suspended or removed permanently.
- Add PO Button
Click on the Add PO button; a new window opens in front of the user.
- Enter the reference number to identify the PO, or the system will automatically generate it as per default settings. e.g., PO/2025/001.
Users can set the default reference number through the document setting option located in “Settings.”
- Enter the supplier’s company name, e.g., ABC Tower Company. You must create the supplier before creating any purchase order (PO) or bill. If you don’t know how to add a supplier, then go to the section “If You Don’t Find Your Supplier’s Company Name” while creating a bill/PO and follow the instruction.
- Click on “project” if this order is related to a specific project. Choose an existing project given in the drop-down option. E.g., ADC trading.
If you want to know about how to add a project, then scroll down and go to the section about How to Add a New Project Name while creating a bill and purchase order.
- Use Project Details—Check this box to auto-fill details from the selected project.
- Enter the purchase order date on which the order was placed: 10/25/2025.
- “Enter the Valid Till” means the date the supplier must confirm or fulfill the PO before or on 11/09/2025 (as given in the image below). After that date, it becomes invalid. After this date, the order cannot be accepted, processed, or used for delivery.
- Enter the discount rate mentioned in the given order and apply a percentage discount to the entire purchase order. E.g., the discount rate is 10%.
- Enter the payment terms, meaning the number of days the purchase remains valid. E.g., 15 days.
- Select the currency for the quotation (e.g., AED).

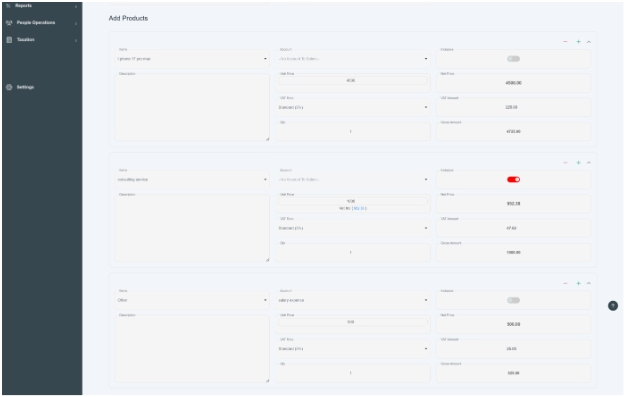
Add product section.
- Click and select the items from the dropdown list. E.g., iPhone 17 Pro Max, consultancy service.
Please ensure that before booking a bill, the related inventory items or services are already created in their respective modules. Or if you don’t know how to create a new product or new service, then go to the section about how to add products and services in CapiPlan Books. (C)
- Enter account name. Choose the related head name in the accounting category.
- Enter a description, like a brief detail of the product/service.
The accounts field depends upon the “item” field; if you are going to add a specific item/service name in the item field, the account field will not display any header in the field. It will automatically add the product/service to their respective accounts.
OR
If you select “Others” in the item field, only expense and asset account codes will appear. If your required account is not listed, go to Chart of Accounts → Profit & Loss to create a new head or add a new account under the appropriate category by clicking on the given button “Add new Heads.”
- Mention the unit price, the price per unit of the product. E.g., AED 4500 or an iPhone; 1000 for consultancy services; and an “other item” provided for 500 AED.
- Click and select applicable VAT rate.
- Enter quantity, the number of items. (We enter quantity only for products, not services).
- inclusive checkbox; here it works like this: in unit price, the VAT amount is already added. Here the system only deducts and calculates the original price of the product and calculated VAT amount from the unit price. When you click on the inclusive button, it means the VAT amount is deducted from the total amount. And when you click “Off,” the button means the VAT amount is included.
- Net price would be automatically calculated.
- Automatically the system would calculate the VAT amount.
- “Enter gross amount” means the total amount, including VAT.
- Use it (+) to add a new product row or (-) to remove one.
Summary
- Summary: You can also add comments or special terms for the invoice in the text area provided.
- On the right-hand side, a financial summary is given. It automatically calculated your grand total, like net amount and discount applied to the overall amount, before or after the VAT amount and the total payable amount.

Signatory
- Select the authorized persons or department responsible for approving or signing the purchase order. There are three options given for the signature for responsible persons.
- After entering all information successfully, click on the save button to add it to the front page of the PO.

- You can also see summarized information will also display in the supplier’s detailed account as well.
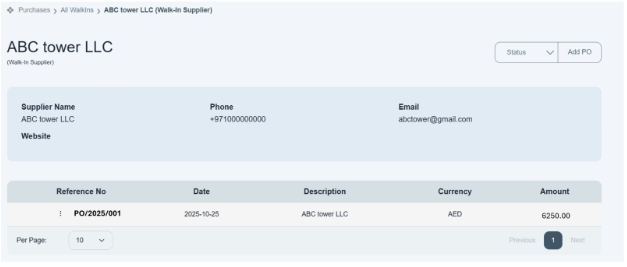
Using this method, you can assign or link a purchase order (PO) to the respective walk-in supplier, ensuring that the transaction is properly recorded and associated with the correct supplier.
