Method of How to add Debit Note
Click on Debit Note/Purchase Return
To add a debit note, first navigate to the Bill Section and create a bill against the specific purchase.
- If the bill has already been created, there is no need to create a new bill.
- Go to the existing bill list.
- Click on the Bill Reference Number of the relevant bill.
This will open the bill details, from where you can proceed to create the debit note.
- Open the specific bill; there are action buttons given on the top-right side of the window to add to the bill account.
- Go to the add payment button and click on it.

- After clicking on the Add Payment button, there is a section given, i.e., a debit note.

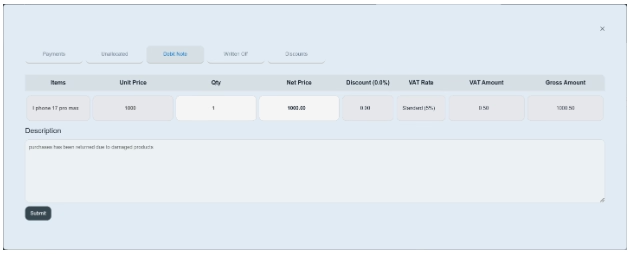
Click on the debit note button; there is a table given consisting of details such as items, unit price, quantity, net price, discount, VAT rate, VAT amount, and gross amount.
Enter all the information.
- Click and select the item of specific bills. E.g., product or service.
Users can create debit notes against any product or service. If you want to create a debit note against a specific item, set the quantity and amount of the other item’s row to zero. Then save the information. This will ensure that the debit note is created only for the selected item and does not affect the remaining items in the bill.
- Enter the unit price of the product/service. E.g., AED 4500.
- Enter the quantity of products. (We only enter quantity of products, not for service, so we put 1 in quantity).
- Enter the net price of the product. E.g., AED 4500.
- Enter discount rate. If discount is provided
- Enter VAT rate, e.g., 5% (standard).
- The system would automatically deduct the VAT amount from the given amount. e.g., 0.50
- The system automatically enters the gross amount in it. E.g., AED 1000.50
- Write a brief description, e.g., a debit note has been issued to the supplier due to damaged products.
- Click on the submit button and save the information.
- Once you submit the information, it will display on the payment history given below in bill details as well as in the debit note/purchase return subsection.
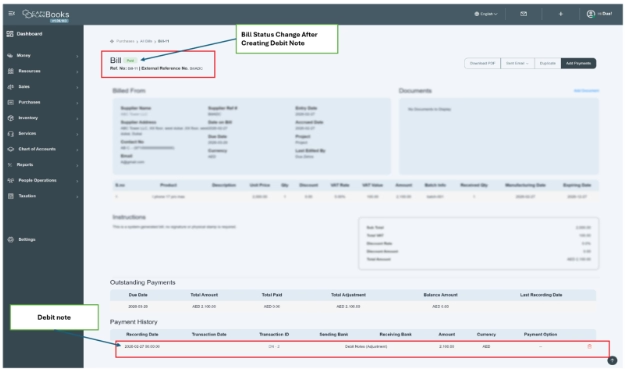
Status—After the debit note is created against any bill, it will also update the status of the bill. Like from an unpaid into a paid bill.
- After submitting the debit note against a product, the bill status will automatically update according to the remaining payable amount. If the bill is partially settled after the debit note adjustment, the status will change to “Partially Paid.” If the bill amount is completely settled, the status will change to “Fully Paid.”
- The below image will show you the impact of a debit note on a bill.