
1. How To Add Invoice
To add an invoice, go to the button located on the top right side of the table list.

Click on the “Add invoice” button. It shows a new window.

Fill in the information.
- Click on Create Invoice. You can add an invoice from the action bar as well as from the front page of the customer list.
- Enter the reference number to identify or track the invoice number, or the system will automatically generate it as per the default setting.
- Enter the company name of the client or company, e.g., XYYZ Trading LLC.
If the customer’s company name is not available, please go to the section How to add the customer’s company name while creating an invoice or quotation/pro forma for detailed instructions.
- Click on the project, and select an existing project to link the invoice.
If you don’t find the project name, then go to section How To Add Project Details. But this option is not mandatory.
- Use Project Details—Check this box to auto-fill details from the selected project.
- Enter the invoice date, the date on which the invoice is created. 10/1/2025 (default is today).
- “Enter the due date” means the last day to pay the invoice. After that due date, it becomes overdue.
- Enter the discount (%) rate mentioned in the given invoices and apply a percentage discount to the entire invoice, e.g., the discount rate is 10% or 0 (if no discount was given).
- Enter the day’s validity, which means the number of days the invoice remains valid, e.g., 45 days.
- Click and select the currency in which the currency was issued. (e.g., AED).
- Enter the bank name and account name. Choose the company’s bank and account details for receivables, e.g., Mashreq Bank.

Click on Add Products.
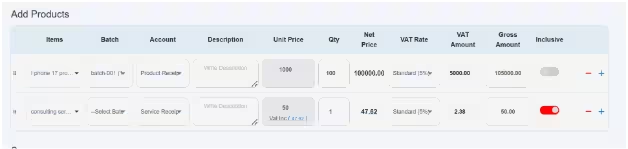
- Click and select the item name as a product or service from the dropdown list, e.g., iPhone 17, consulting services, etc. Select the product or service name from the dropdown list. If you want to add any non-product or non-service item, then select ‘Others’ from the dropdown options
If you don’t find your product and service in the product/item field, then go to the section How to add new items/services in the item field.
- Click and select the batch number from the dropdown menu. The system will automatically display all available batches for selection. This option is applicable only in the item scenario, not for services, where batch tracking is enabled.
- Enter account name. Choose the related accounting category.
The accounts field depends upon the item if you are going to add a product/service by its name in the item field. It will automatically show you two options in the account head, i.e., product revenue and service revenue. Just select it, and it will automatically add the item to their respective accounts.
OR
The second is if you select “others” in the item section and you don’t find your account head in the account field, to select the account code, go to charts of accounts, and click on the profit and loss subhead. A new page will open and allow the user to create a new account head or add a new account head under default categories.
- Enter descriptions with brief detail of the product.
E.g., the invoice for the product or service will be valid in a given time period. After the time, the price would fluctuate as per the exchange rate.
- Enter unit price, the price per unit of the product/service, e.g., AED1000 for an iPhone 17 and 50 for consulting services.
- Enter the quantity of items being quoted. We enter quantity only for products, not for services. For service, you can add 1 in quantity.
- Net price would be automatically calculated once the quantity is updated, e.g. If the unit price is AED 1,000, then the cost for 100 pieces would be AED 100,000.
- Click and select the applicable VAT rate, e.g., 5% standard.
- Automatically, the system would calculate the VAT amount, e.g., 5000 for the iPhone 17 Pro Max and 2.50 for the consulting service.
- “Enter Gross amount” means the total amount including VAT. e.g., the gross amount would be AED105000 for the iPhone 17 Pro Max and 52.50 for the consulting service, etc.
- inclusive checkbox, here it works like this: in unit price, VAT amount is already added. Here the system only deducts and calculates the original price of the product and calculated VAT amount from the unit price. When you click on the inclusive button, it means the VAT amount is deducted from the total amount. And when you click Off, it means the VAT amount is included.
- Use (-) to remove or (+) to add a new product row to add multiple items or services in an invoice.
- The system allows users to swipe through item sequences based on their individual preferences and requirements. Hold the icon given with the “item field” and drag the row as per your need.
Users can review and select items efficiently by simply swiping up and down, depending on their needs. This feature enhances user experience by providing intuitive, quick, and flexible navigation through available content.
- Enter a brief summary in the designated text area to include comments, special instructions, or specific terms and conditions related to the invoice. This section allows you to clearly communicate any additional details to the customer.
Users can also configure default terms and conditions in the system settings. Once set, these terms will automatically appear on every invoice, eliminating the need to enter them manually each time.
- On the right of the table, a financial summary is given, which automatically calculates your net amount and discount applied to the overall amount, before or after the VAT amount and total payable amount.

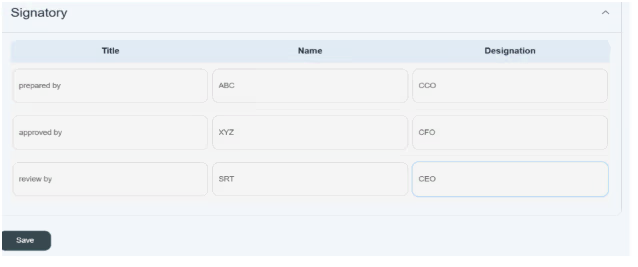
- There are three options given for the signature of responsible persons. Select the authorized person or department responsible for approving or signing the proforma invoice.
After enter all information successfully, click on the save button and add information in your record
Once you save the invoice, the new invoice will be added to the front window of the invoice module with the “unpaid status.”
The user can also access the invoice from the customer account.

In this way, the user can generate the invoice in Capi Plan books.
Click on these given links to know more about the functionality of “Action Buttons” or “How To Book Receipts Against the Invoices” and follow the instructions.
