How to create Add unallocated receipts
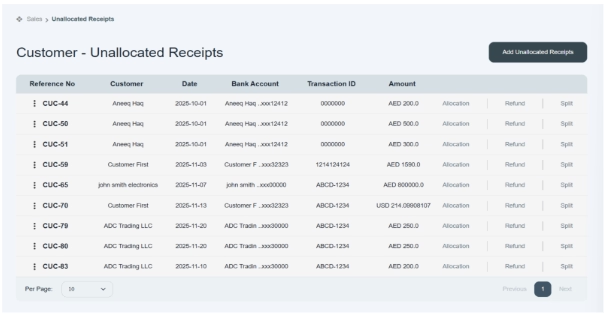
If you add unallocated receipts, go to the unallocated subsection given in the sales module. Click on “Unallocated receipts”; a new page opens in front of your screen.
There is summarized information available in table form. There are three more options available on the left side of the table, i.e., Allocate | Refund | Split. There is a button provided on the top right side of Add Unallocated Receipts; click on it, and a new page opens in front of you.
Click on unallocated receipts.
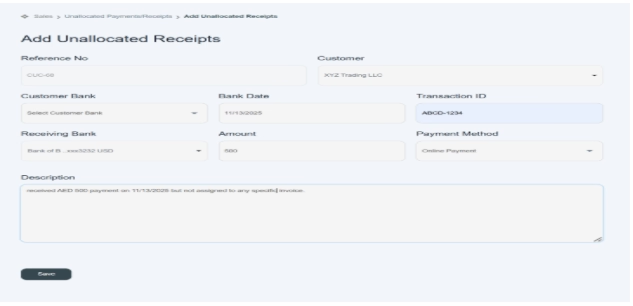
- Enter the reference number, or the system will generate a reference number to allocate the unallocated receipts.
- Click and choose the customer name from the drop-down section. E.g., XX customer
- Click and choose the customer bank name from the drop-down section. E.g., ABC Bank, etc.
- Enter the bank date, which is the date you received payment in your bank account. e.g., 11/13/2025
- Enter the transaction ID provided by the bank, mentioned on the receipt. ABCD-12345
- Click and choose the receiving bank in which you received the payment. E.g., a bank of 9
- “Enter amount” means how much amount you received in the bank. e.g., AED 500
- Click and choose the payment method that you used for payment. E.g., check, online payment, bank transfer, etc.
- “Enter description” means writing a brief note or instruction related to receipts.
- Click on the submit button, and you will see this transaction on the payment history on the front screen.
- You can click on it and track your unallocated receipts from customer and invoice details.
- A new payment would be displayed on the table of the customer’s unallocated receipts.