
How we convert walk-in customers to added customers
“Convert to customer” means in the future, if a walk-in customer were to be converted into an actual customer, then we need to go to this option; given in blue font is Convert to customer.”
Click on the “Convert to customer” option.
Click on the “convert to customer” option.
Once you click on it, it shows you a new page. There are some expandable sections given here.
The first section belongs to customer details. The system automatically added information to it.
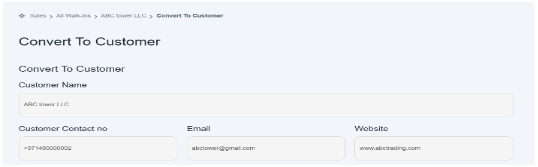
Basic Information
- First you have the basic information section; click on the drop-down button located at the left side of the bar.
- Enter the customer’s company name. e.g. ABC tower LLC
- Click and select the legal status of the customer’s company. E.g., LLC, government, partnership, enterprise, etc.
- Click and select the nature of the company. E.g., financial services.
- Enter the company contact number. e.g. +971 4 800 0002
- Enter the email address of the company. E.g., abctower@gmail.com.
- Enter the website of the company. E.g., www.abctrading.com.
Contact Person Details
Click on Contact Person Details.
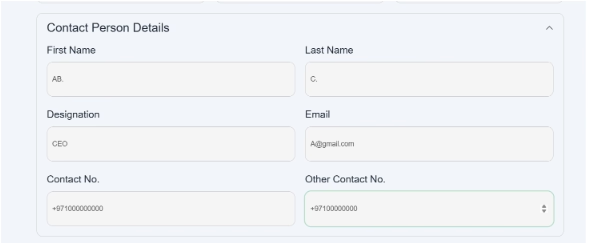
In this section you will enter customer information. That individual’s information, who is responsible for communication.
- You will have a Contact Person section; click on the drop-down and fill in the details.
- Enter the first name of the customer. E.g., AB
- Enter last name of customer. E.g., C
- Enter the designation of the customer, e.g., CEO, CCO, etc.
- Enter the email of the customer. E.g., A@gmail.com
- enter the contact number of customer. E.g., +97100000000
- Enter the other person’s contact number too. E.g., +9719900000
Click on “Bank Detail.”
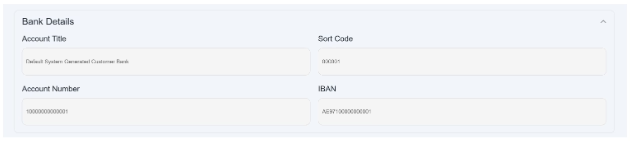
In this section you will add bank details of the customer’s company.
- You will have a bank details option given in this section; click on the drop-down and fill in the details.
- Enter the client account title name, e.g., the company’s name, e.g., ABC Trading of the Metropolis Tower.
- Sort the code/branch code given by the client. e.g., 012345
- Enter account number, e.g., 0102000000000.
- Enter IBAN number, e.g., AEXXXXXXXXXXXX.
For user convenience, if the user does not deal with customer bank information or does not require this information, the system automatically provides default bank details on a provisional basis.
This ensures that the invoice or quotation can still be generated without interruption. While the user adds customer information here, it will help them in AML management.
Click on Invoice Detail.
- In this, you have the Invoice Details section; click on the drop-down and fill in the details.
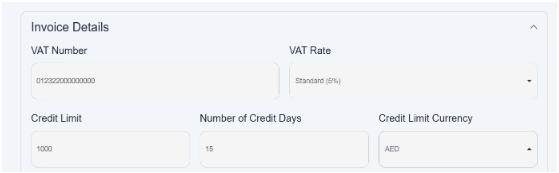
- Enter the VAT number given in the invoice. E.g., 012322000000000
- Click and select the VAT rate also mentioned in the invoice number. e.g., 5%
- “Enter Credit Limit” means how much the user is allowed to pay from the bank account, e.g., AED1000.
- “Enter Number of Credit Days” means the time allowed to pay the invoice before it becomes overdue. E.g., 15 days
- “Enter Credit Limited Currency” means which currency you are paying in. E.g., AED, USD, etc.
Click on Addresses.
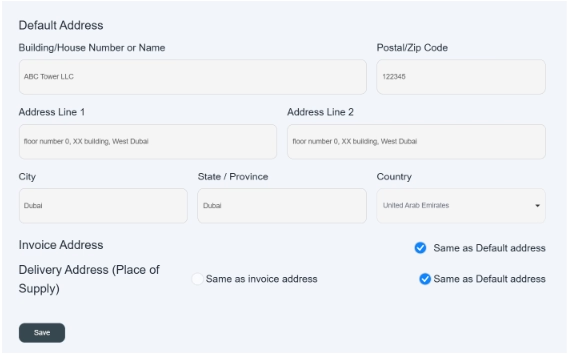
You will have an address section; this section is mandatory to submit this form. Click on the drop-down and fill in the details. In this section, you will add the addresses of the customer’s company.
Here you have three type of addresses
 Default address
Delivery Address (Place of Supply)
 Billing Address
- Default address
This is the primary or registered address of the customer.
- Enter the building/house number or name, e.g., ABC Tower LLC.
- Enter the correct postal/zip code in it. E.g., 122345
- Enter the address lines 1 & 2, e.g., add floor name, street name, block, building name area, etc., e.g., floor number 0, XX building, West Dubai.
- Enter the city name. e.g., Dubai
- Select or type the state or province, e.g., Dubai.
- Choose the country from the dropdown list. E.g., UAE
- Delivery Address (Place of Supply)
This is where goods or services will be delivered.
Same as the Default Address section.
Checkbox: “Same as Default Address” – Tick this if the delivery address is the same as the default one; it will auto-fill the details. If not, then enter like this as given below.
- Enter Building/House Number or Name, e.g., ABC tower LLC
- Enter the correct postal/zip code in it. E.g., 122345
- Enter the address lines 1 & 2, e.g., add floor name, street name, block, building name area, etc., e.g., floor number 0, XX building, West Dubai.
- Enter the city name. e.g., Dubai
- Select or type the state or province. E.g., Dubai
- Choose the country from the dropdown list. E.g., UAE
- Billing Address
This is the address where the invoice or billing documents are sent.
Same as above.
- Checkbox: “Same as Delivery Address”
Tick this if the billing address is identical to the delivery address; it will auto-populate automatically.
- Checkbox: “Same as Default Address”
Use this if billing is identical to the default address.
If it’s not identical, then enter it like this as given below.
- Enter Building/House Number or Name, e.g., ABC tower LLC
- Enter the correct postal/zip code in it. E.g., 122345
- Dubai. Enter the Address Line 1 & 2, e.g., add floor name, street name, block, building name area, etc., e.g., floor number 0, XX building, West Dubai.
- e.g.,Enter the city name. e.g., Dubai
- E.g., select or type the state or province, e.g., Dubai.
- E.g.,E.g.,Choose the country from the dropdown list. E.g UAE
- button. Once you’ve filled in all the details, then click on submit button.
- You will land on the front screen of the customer window.
- Here you can see the new customer account displayed on the front screen.
- By clicking on it, you can recheck details and add more information in it. Then you can add invoices and add proforma quotation invoices as well by following the steps as mentioned in the customer account.
