
2. How To Create Real Estate Quotation/Proforma invoice
To create a real estate quotation, go to the quotation subhead given in the sales module. There is a button given, i.e., “Add Quotation/PI.” Along with the button, there is a dropdown icon given. Click on it and it will give you option such as
- Real Estate Quotation/Proforma Invoice
- Gold Quotation/Proforma Invoice
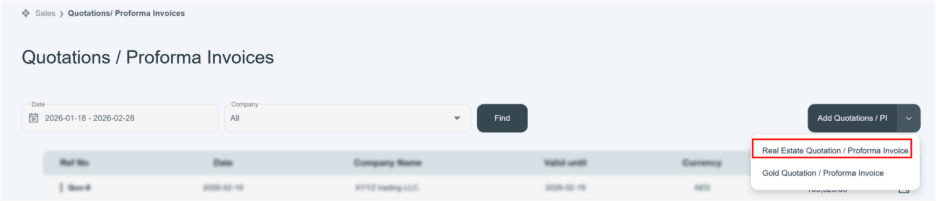
Click on Real Estate Quotation/Proforma Invoice
Make sure you have already created the customer in your system to whom the real estate quotation will belong.
Click on Add Real Estate Quotation.
It will show you a new quotation page with fields related to real estate. Select the desired option that you are going to create.
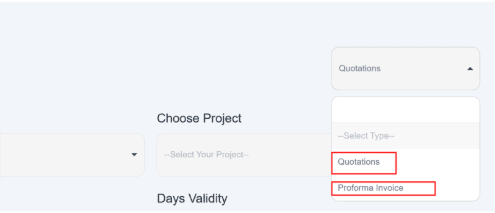
Fill in the information.
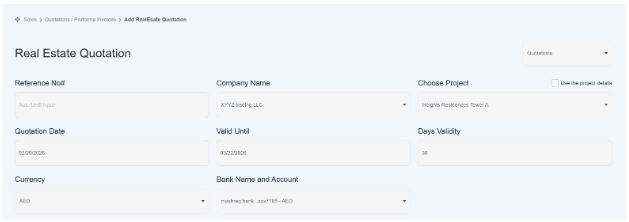
- Enter the reference number, or the system will automatically generate it as per the default setting. Given in quotation.
- Enter the company name of the customer’s company, e.g., XYYZ Trading LLC.
If you don’t find the customer’s company name, then go to the section “How to add the customer’s company name while creating an invoice or quotation/proforma.” Follow the instructions, refresh the page, and then create the quotation.
- Click on “project”; if you want to link the quotation to a specific project, choose a project from the drop-down option or create a new one. E.g., Heights Residences Tower A
To create a new project, follow the instruction given in section How To Add A Project Details. (This option is not mandatory).
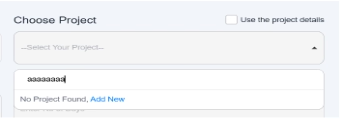
- Use Project Details – Check this box to auto-fill details from the selected project.
- Enter the quotation date, the date the quotation is generated. 02/20/2026.
- “Enter the due date” means the last date by which the customer must make the payment. E.g., 03/22/2026
- Enter the discount rate mentioned in the given quotations and apply a percentage discount to the entire quotation. E.g., the discount rate is 10%.
- Enter the Number of Credit Days, meaning the number of days the quotation remains valid. E.g., 30 days.
- Enter and select the currency for the quotation (e.g., AED).
- Enter the bank account name. Choose the company’s bank account where the payment was received.
ADD PRODUCT
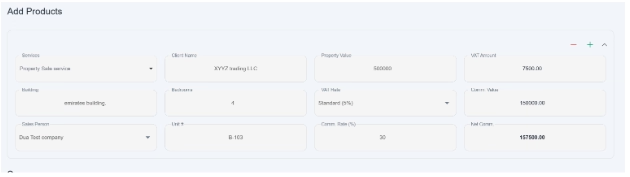
- Click and select the service from the dropdown list. E.g., property sale service, etc.
Since this quotation is service-based, if you don’t find your service, write your service name in the given space. Then you can see the add new service option will appear in the drop-down menu.
Click on add new service and create the service. Or go to the section How to add new items/services in the Item field. Follow all instructions. Then go back and again create a real estate quotation. Select your service name, and this time it will display in a drop-down list, and create a quotation.
- Building – write a building name where this real estate property is located. E.g., Emirates Building.
- Salesperson—the person who is responsible for the sale. E.g., your real estate company name.
- Client Name—the person’s name who buys the property. E.g., XYYZ Trading LLC.
- Bedrooms—how many bedrooms were there in the apartment or property? E.g., 4
- Unit # – unit could be used to identify the flat, apartment, office, etc. e.g., unit # B-103
- Property Value—the amount of money on which property was sold. The agreed amount between the seller and buyer on which the property was sold.
- VAT rate—Click and select applied VAT rate. e.g. 5% standard
- Commission Rate (%—The commission rate is the fixed percentage of the amount paid to someone for facilitating the service.
- Vat amount- Automatically system would calculate Vat amount. e.g., it would be AED 45.00.
- Commission value—the amount that was paid to the person or agent as per the commission rate.
- Net Commission—the final overall amount of commission you actually received after all deductions.
- Use + to add a new product row and – to remove one.
- On the right side of the financial summary, the total amount is calculated and shows you every detail, including the net amount, discounted amount (if applied), before or after VAT amount, and total payable amount.
- Users can enter a brief summary in the designated text area to include comments, special instructions, or specific terms and conditions related to the quotation. This section allows you to clearly communicate any additional details to the customer.
- Users can also configure default terms and conditions through document settings. Once set, these terms will automatically appear on every quotation, eliminating the need to enter them manually each time.

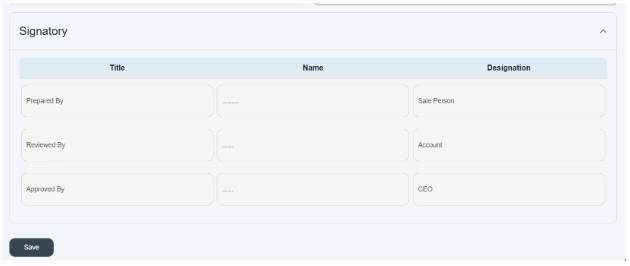
- Also, below there is a signatory option given to add signatures; click and enter the title, name, and designation of authorized persons or departments who are responsible for approving or signing the quotation or proforma.
- If you don’t want to include this information in the quotation/pro forma invoice, leave this section empty because this is not mandatory.
- If you want to add an authorized person’s signature on every quotation or proforma invoice, it can be set through default document settings.
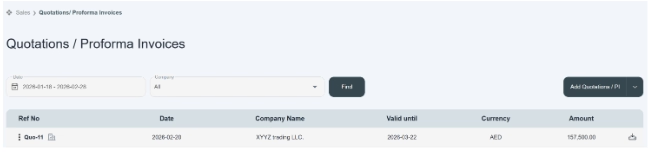
- After submitting the form, all your information will appear on the customer’s screen in a summarized form.
- The new quotation is listed along with the icon, where all existing quotations are listed in a table.
Through this process, users can create real estate quotations as well as pro forma invoices. This system allows users to enter all required property and commission details, review the information, and generate either a quotation or a proforma document based on business requirements.
